
The one issue with the book is that most of the breads offered need special equipment beyond the standard kitchen's supply. The most used item in the book is a dutch oven, which we were given with the book (SO generous) but other recipes also call for a pizza stone, a pizza peel, and a Römertopf French Bread Baker, none of which we have. The lovely thing about this recipe is that it requires none of the above: all you need is a rimmed baking sheet. Stecca has basically emerged as our favorite bread of the bunch; it needs a little more work than some of the others, but it is light and flavorful enough that we eat it on its own and often go through the entire batch in a single day. I think we maybe had leftovers once. Maybe.
The thing to remember with this bread (as with all the breads from this book, which I highly recommend) is that though there is little actual labor there is a LOT of waiting time. I generally stir up the dough for the first rise at about 6 or 7 pm so that it can rise all night and be ready to go when I wake up in the morning. This recipe is slightly adapted from the original with what I have learned works best for me from making it a couple of times a week for the last month. I took a lot of pictures when I made it this morning so that it would be easier for everyone else to try.
Adapted Stecca Recipe (makes 4 "sticks", or loaves):
- 3 cups flour
- 1/2 tsp table salt
- 3/4 tsp sugar
- 1/4 tsp active dry yeast
- 1 1/2 cups water
- olive oil
- coarse salt
Mix together the flour, table salt, sugar and yeast in a medium sized bowl. Add the water and mix well. Cover with a towel (I always use a cloth napkin, because it will come in handy later) and set aside for twelve to eighteen hours. DO NOT try to make it rise any faster, it is vital for the bread to work that it rises a minimum of twelve hours. This is why I like to mix it up at 6pm, because by the time I wake up the next morning at 7.30 it's ready to go. Before rising it should look like this:

The next day the bread should look like this, having about doubled in size:

Using a floured spatula, scrape the dough out onto a HEAVILY FLOURED surface. If it is your first time making it, I suggest not using the table top but flouring a cutting board instead. Sometimes this dough will come out incredibly viscous and difficult to work with and you have to have enough flour to be absorbed AND keep the dough from sticking. If you have enough it should form fairly easily into a ball-like shape, looking slightly flattened. This is what mine looked like this morning, but other times it has been far flatter than this so don't worry about it:

If you have put down enough flour not only will you have a workable dough that you can pick up without fear of it oozing through your fingers, you will also have a ton leftover. Never fear! Sweep this excess flour off of the work surface and sprinkle it onto a towel or cloth napkin that is NOT fuzzy. I find cloth napkins work best for this; in fact I now have one specially set aside for baking bread with. A tea towel or dish towel will work as long as it does not have fuzzy fibers everywhere; they will stick in the bread and it will turn out gross. Anyway, using your extra flour flour the tea towel like you did your work surface. You should not need quite as much flour as you did before, but if the excess is not enough don't be scared to add more. Pick up the dough and flip it onto the dusted towel so that the creased part of the dough (from when you formed it into a ball) is on the bottom and the uncreased part (which was previously the bottom) is on the top. If it is still sticky sprinkle a bit more flour on top and then fold the napkin or towel over it for a second rise. Set a timer for an hour and a half.
 After ninety minutes have gone by, make sure there is a rack in the middle of your oven and set it to 500 degrees Fahrenheit. Pull out a rimmed baking sheet (the book recommends 13 by 18 but a bit smaller or bigger works too) and oil it with vegetable or olive oil. Set your timer for an additional thirty minutes. At the end of that half hour your dough should be finished rising again and it will look something like this:
 Isn't that pretty? Now take a large, sharp knife and flour it. Use the knife to cut the dough into four equal and separate pieces.
 Now take each piece individually and stretch it so that it reaches from one end of your oiled baking sheet to another. Stretch all four on the same sheet, with at least about an inch between them. I like to pat them down a bit with my fingers to even them out, but they are not going to look uniform so give that up before you start.
 Brush the loaves with olive oil and sprinkle with the coarse salt. We don't have a pastry brush so I just fill a teaspoon and dribble it over the dough, then spread it with the back of the spoon. It takes about 1/2 to 3/4 of a teaspoon per loaf for me. Don't be scared of the salt, either, if you end up accidentally putting too much on you can brush it off before eating and it will still taste great.
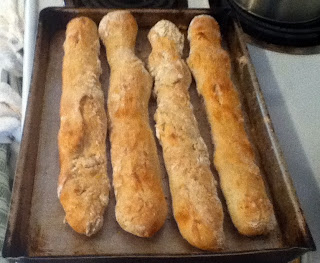
Put the tray in the center of the oven and set your timer for fifteen minutes. If the loaves look golden and crusty after baking that long take them out; if they don't leave them in for a bit longer. When they are done baking turn off the oven and leave the tray on the stove for five minutes before transferring the loaves to a cooling rack. Let cool at least half an hour before eating; they are still baking after they have come out of the oven! Enjoy as a snack, with some soup or for a delicious savory breakfast. As I've said M and I have not yet found a need to even put butter on this bread. It's absolutely amazing.

No comments:
Post a Comment